 5.5 Pressurization: Pressure Tanks 5.5 Pressurization: Pressure Tanks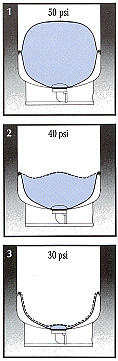
The life of a pump is determined by how many times it is started and stopped as well as how long it ’s on. The pump life will be greatly extended if we can figure out a way to store extra high-pressure water every time the pump comes on. The next time the faucet is opened, water would flow from the storage chamber and thus the pump could rest for a while - at least until the stored water runs out. This is the principle behind the use of a pressure tank piped into the discharge piping of the pump. A pressure tank is simply a tightly sealed storage tank with a gas space that compresses as you fill the tank. The compressed air acts like a spring to force water out the next time you open a tap. Most tanks today have a flexible bladder inside that holds the air. Water absorbs air so the bladder keeps the air isolated from the surface of the water so you don’t have to keep refilling the tank with air (usually about once a year). The bladder is pre-charged with air to a pressure slightly lower (about 2 psi) than the ON setting of the pressure switch. A pre-charged, or pressurized tank, will give the same amount of water capacity as an old fashioned, non-pressurized tank, but with a smaller tank size.
The pressure tank is piped into the system so that when the pump is on, water is diverted into the tank as it simultaneously provides water to any spigots that you’ve opened. When you finally stop using water and turn off the tap, the pump will continue to run, compressing the air in the tank. Once the tank fills to a pressure of about 50 to 60 psi, a pressure switch shuts off the pump. The next time you use water however, the compressed air in the tank acts as the pressure source and drives the water through your system. As the tank empties, the air expands and the pressure in the tank drops. Once the tank pressure gets to about 30 psi, a pressure switch turns the pump back on, filling the tank and at the same time supplying water to your spigots.
Things to consider in selecting a pressure tank are:
-
Size
-
Material of construction
-
Cost
Pressure Tank Sizing
There are several manufacturers available but they all tend to recommend that the tank be sized so that the pump doesn’t have to come on more than 25 times in an hour. People in the business have taken typical scenarios and came up with a rule of thumb:
There should be about one gallon of tank capacity for every 100 gph of pump capacity.
In our house example, the flow rate was 10 gpm or 600 gph. The pressure tank would need to be 600 gph / 100 gph = 6 gallons (of tank capacity). I personally think you should at least double that number. Tank costs, which we shall look at in a minute, are not extravagant, so after we select a rule-of-thumb size (6 gal), we’ll look at tank selection.
Pressurization Tank Selection
 This is a chart associated with pressure tank selection. We’re interested in the “draw down gallons”. This is the number of gallons that can be supplied by the tank, given a preferred pressure range, before the pump has to turn on and supply both the spigots that are open at the time and the pressure tank refill. This is a chart associated with pressure tank selection. We’re interested in the “draw down gallons”. This is the number of gallons that can be supplied by the tank, given a preferred pressure range, before the pump has to turn on and supply both the spigots that are open at the time and the pressure tank refill.
|
Draw Down, Gallons (PSI) |
Total Tank Volume (gallons) |
Tank |
Height |
Weight |
System Conn. Size |
Factory Precharge Pressure |
@20/40 |
@30/50 |
@40/60 |
Diameter |
pounds |
0.78 |
0.65 |
0.57 |
2.1 |
9.0" |
11.3" |
7 |
3/4" |
28psi |
1.7 |
1.4 |
1.2 |
4.5 |
10.0" |
15.7" |
10 |
3/4" |
28psi |
3.1 |
2.6 |
2.3 |
8.5 |
12.6" |
19.3" |
13 |
3/4" |
28psi |
5.2 |
4.3 |
3.8 |
14 |
16.0" |
18.0" |
29 |
3/4" |
28psi |
5.2 |
4.3 |
3.8 |
14 |
16.0" |
21.7" |
31.5 |
1" |
28psi |
7.4 |
6.2 |
5.4 |
20 |
16.0" |
28.8" |
38.5 |
1" |
28psi |
9.6 |
8.1 |
7 |
26 |
16.0" |
36.0" |
43 |
1" |
28psi |
11.8 |
9.9 |
8.6 |
32 |
21.0" |
27.8" |
59.5 |
1" |
28psi |
12.3 |
10.3 |
9 |
33.4 |
16.0" |
42.8" |
57 |
1" |
28psi |
16.3 |
13.6 |
11.9 |
44 |
21.0" |
36.2" |
71.5 |
1-1/4" |
38psi |
22.9 |
19.2 |
16.7 |
62 |
21.0" |
47.9" |
85 |
1-1/4" |
38psi |
30 |
25.1 |
21.9 |
81 |
21.0" |
62.0" |
103 |
1-1/4" |
38psi |
31.5 |
26.4 |
23 |
85 |
26.0" |
44.4" |
140 |
1-1/4" |
38psi |
43.6 |
36.8 |
32.1 |
119 |
26.0" |
62.0" |
168 |
1-1/4" |
38psi |
In our example we needed a minimum of 6 gallons of draw down. If we are going to set our pump pressure switch to operate between 30 and 50 psi we would select the 20-gallon tank highlighted in yellow (sixth from the top in the second column from the left). Notice that the tank is 16 inches in diameter and 28.8 inches high. My recommendation would be to buy the 44 gallon - 13.6-gallon draw down tank that is 21 inches in diameter and 36.2 inches high. It won’t cost that much more and will allow the pump to rest twice as long.
For normal farm use, a 42-gallon pressure tank is recommended as a minimum size. The larger the tank the better, especially if the well or pump has a low capacity. A relief valve should be installed if the pump is capable of generating more pressure than the maximum working pressure of the pressure tank.
I am including the following as a maintenance tip:
Procedure for precharging pressure tanks and setting the tank discharge pressure switch:
Shut off the pressure pump.
-
Drain all water from the pressure tank, then add air with an air compressor until air spurts out of the drain tap. Shut off the tap.
-
Using a compressor, pressurize the tank to 3 - 5 psi below the pump cut-in pressure.
-
Start the water pump.
5.6 Pressurization: Pressure Switches and Their Setting
A water pressure switch is not a simple on off switch like the one used to turn lights off and on. We will explain how it works using an example.
The very first time you turn the power on to your pumping system, the pump comes on, and water begins to fill the pressure tank. As the water fills the pressure tank it compresses the air trapped in the top of the tank. The tank pressure slowly rises until the cutout or cut-off pressure setting of the pressure switch is reached. This is usually about 50 to 60 psi (3.3 to 4 bar). This is where everything stays until you open a spigot. Let’s assume you are about to take a long shower. When you first start the shower, the water pressure is provided by the compressed air pocket in the top of the pressure tank. The pump remains off. The 50 or 60 psi (3.3 to 4 bar) air begins to push the water to you, but as the water leaves the pressure tank, the air pocket has to get bigger (expand) which causes the air pressure in the tank to decrease. This continues until the cut-in pressure setting of the switch is reached; usually 30 to 40 psi (2 to 2.6 bar). This starts your pump which now supplies water for your shower, and at the same time, begins to fill the pressure tank. If the pump is well-sized (pardon the pun), the pump will provide plenty of water for your shower, and begin to refill your pressure tank until the cutout pressure is again reached (50 - 60 psi or 3.3 - 4 bar). If you’re still not finished with your shower, the cycle repeats itself until you are. The advantage to all this, is that your pump didn’t have to be on the whole time you were showering.
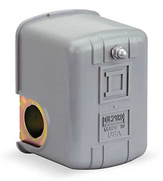 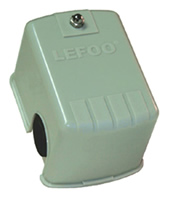 There are several manufactures in the world for these water pressure switches. Two of the most common are SQUARE D and LEEFO (China). The following method for setting a SQUARE D switch is copied from a WEB Site that I am afraid I cannot locate any more. If anyone recognizes the source, please e-mail me so that I can give them credit. Most pressure switches will have an explanation for setting them taped to the inside of the cover. If you have a new installation, I recommend you copy these instructions down somewhere safe because the mud daubers and ants like to nest in these covers. There are several manufactures in the world for these water pressure switches. Two of the most common are SQUARE D and LEEFO (China). The following method for setting a SQUARE D switch is copied from a WEB Site that I am afraid I cannot locate any more. If anyone recognizes the source, please e-mail me so that I can give them credit. Most pressure switches will have an explanation for setting them taped to the inside of the cover. If you have a new installation, I recommend you copy these instructions down somewhere safe because the mud daubers and ants like to nest in these covers.
 Q. How do I adjust my pressure switch? Q. How do I adjust my pressure switch?
A. Since Square D is probably the most popular pressure switch on the market, that’s the one we will talk about.
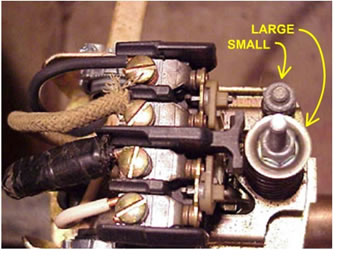
The Square D pressure switch and a few other brands that have copied Square D normally have two springs pushing down on a plate supported on top by 3/8” locking nuts. These nuts can be adjusted to set the desired on/off pressure of your pump motor.
If you are looking to increase the pressure switch settings, you should first adjust the taller of the two springs. This spring will move the on/off setting evenly. That is to say a 20/40 setting can easily become a 30/50, 40/60 or anything in between. To raise the pressure, turn the tall spring’s nut clockwise a few turns. Turn on a faucet and watch your gauge ( a good working gauge is necessary ). When the pump starts, the pressure on the gauge is your on pressure. Close the faucet, and let the pump shut off. This pressure is the off pressure. To decrease the on/off pressure, turn nuts counterclockwise.
To increase the off pressure, turn the short spring’s nut clock wise a few turns and run water to re cycle the pump. Keep adjusting for desired off pressure.
I don’t recommend setting switch higher than 70 PSI for many reasons.
Some bladder tanks will not allow much more than the 20-psi differential. Don’t top out the bladder. This will shorten it’s life dramatically.
Reminder:
It is a good idea to recharge your pressure tank with air, and check the pressure switch cut-in and cut-out setting once a year. You will know you’ve lost the air pocket or have a pressure switch-setting problem if your pump starts cycling off and on several times a minute while you are using water.
5.7 Pressurization: Freeze Protection
You might need a small housing to go over the pump, pressure tank, and pipes to keep the system from freezing. I’ve seen some folks put all three pieces in a four-foot wide cement culvert pipe that has been vertically buried part way in the ground. They put a high wattage light bulb, on an extension cord, in the culvert pipe during very cold weather. You can usually purchase such a pipe and plastic cover at a farm supply. I would suggest that you consider drainage so that you don’t wind up with a culvert pipe full of water. Another protective enclosure that I’ve seen is a small bamboo house with a door that lifts off. Blankets and/or a small heater or a high wattage bulb can be used to prevent freezing during very cold weather. You might also consider checking with a chicken farm supply company asking about what they have on the market that would normally be used to keep small chicks from freezing during cold weather. A packaged system might be inexpensive and include a heat source and thermostat. Creativity and remembering that water pipes freeze should be a key consideration. The pressure tank is not likely to freeze during normal daily use but is prone to do so if left dormant for several days in freezing weather.
|
